Hi everyone!

As part of my photography course, I have to track my development on a blog. The posts from September 2011 until January 2012 are part of a module called Project Management, for which I was required to work in a group of eight students to create an exhibition. The blog followed every step we took in order to create a successful gallery. The blog posts starting from September 2012 follow my final year on the course. I'll be documenting my research and analysis of my final year projects, as well as include notes of my Professional Practice unit - which prepares us for a range of post graduate options. Finally it also looks at a project called New Creatives, where I'll be working alongside an artists to help college students get more involved with art.

Thursday, October 25, 2012

Large Format Shoot


For some reason I was unable to create a contact sheet in Bridge, so I just took a snapshot of the photos. The first four pictures were taken on the first shoot and the last 5 were taken on the second shoot. As you can see one of them is messed up. This is because I didn’t close the film holder properly, I didn’t think that light had come in, but obviously it did. Luckily I took 3 woodland photos, so it’s not that big of a problem. I scanned the images in on 2040ppi.

Scanning was quite difficult because the last time I used to scanner was in the first year for the workshop. I tried to get the colours right, but it was quite tricky for some of them. I have had to do little edits to some of the photos, but luckily most of them turned out fine.

I am incredibly happy having done a large format shoot, but I’m not too happy with all of the photos. I like the chopped down areas and the woodland, and the final photo, but I don’t like the heathland photos or the first overgrown photo. I think for my final project I’d like to combine both digital and large format in order to get the best result. 

Group Tutorial 3


For this tutorial we did a quick version of the 6 thinking hats and reduced it to three major points of discussion. We did look at all of the 5 we looked at last time, but only recorded three of them and added further research.

Information:
·         Project on succession
·         Time, endless process
·         Woodland to heathland
·         Time lapse – landscape changing

Positive
·         Time lapse – positive
·         Figure walking – interesting
·         Music – brother composes
·         Add text
·         Circle image works
·         Think of size and scale
·         Produce text on a leaflet
·         Speak to volunteers, think about having them in the project
·         Look at more scientific work
·         The circle images looks like a clock – representing time
·         The people in the time lapse shows that it isn’t a natural process
·         Divided opinions of whether to have people in time lapse or not

Critical/Move forward
·         Circle shape – do test prints
·         Experiment with scale
·         Look at the converging lines (fish eye)
·         Move the time lapse slower
·         Make the time lapse into a continual loop
·         Test prints – especially acrylic
·         Analyse large format images
·         Do more time lapse videos and make them more fluid

Research
·         Malcolm Andrews
·         Landscape into Western Art
·         Andy Goldworthy

Sunday, October 21, 2012

New Creatives

As you can see from the facebook snapshot to the left, I've been quite busy. I got myself a part time job at Subway, I was selected for a program called New Creatives (explanation below), I heard back from Fergus Heron and I will be assisting him on a photoshoot, I've done a large format shoot, made a time lapse, I have a job interview for The Body Shop, my cousin came over to visit from Holland, and I think that's about it. Other than that I've been trying to memorize all the subway sandwiches, do all my uni work, attend lectures and that general stuff.


I received an email saying the following:
The University of Portsmouth, Aspex Gallery and six FE colleges/sixth form colleges are jointly inviting Creative and Cultural Industries students to work with a commissioned artist for New Creatives 2013, an artist-led exhibition project aiming to inspire FE students and exploring ‘Does making things make us human?’. Please note this is an unpaid, voluntary work initiative.

What’s in it for you?

Three selected CCI students will each work as ‘buddies’ with a commissioned professional artist who will lead the students in two FE colleges each, from the period September 2012 – May 2013. The participating colleges are South Downs, Highbury, Gosport, Havant, St Vincent and Fareham.

The external influence of working with a professional artist, gallery, Faculty member and FE college will build your confidence and provide professional practice. You will experience how creative professionals work in education and learn how a ‘creative brief’ can be delivered in a wider cultural context, at the same time as learning personal skills such as negotiation, organisation and communication skills.

The project will give you the opportunity to make your own creative blog in support of the artists which will be linked to from the New Creatives website www.newcreatives.org.uk

What’s the job?

If selected you will be asked to:

•       Attend a launch event on 22 October 2012 at Aspex Gallery.
•       Liaise closely with one of the commissioned professional artists on your availability.
•       Shadow or buddy the artist on two visits to FE colleges, observing, recording and assisting where necessary.
•       Remain in contact with the CCI Faculty Promotions Manager as a link between colleges, artists and the University.
•       Record your experience as part of your professional practice as a student creative practitioner.
•       Act as an ‘ambassador’ for the Faculty of Creative and Cultural Industries in a key regional cultural project.
•       Attend the exhibition preview at Aspex on Friday 8 March 2013.

How can I participate?

Please send a 200-300 word ‘expression of interest’ plus your CV, including your contact details by email todenise.callender@port.ac.uk.

Deadline for submissions: Monday 8 October 2012.


I don't usually go for opportunities like these, but figured I might as well try and if I get it I get it, if I don't I don't. I wasn't really expecting to hear back because my CV isn't really the best and I'm not very good at writing why I should be chosen out of however many people apply.

Anyway, I just tried and wrote a little statement explaining I've been looking into jobs when I'm finished with my course, and explained that all employers are looking for experience, and that helping out with this would be exactly the kind of experience I need. I went on to explain how I've set up a gallery in groups and added my blog address.

I applied on the 1st of October and heard back on the 11th of October:


Dear Elaine
I am delighted to inform you that you have been selected as a buddy for the New Creatives artist-led exhibition project.
Please take some time to make yourself familiar with the website and the attached document which is a guide aimed at the participating colleges, but will also give you and understanding of how the project operates. There are some key marker dates on page 3 which you should make a note of. Vicky Chiswell at Aspex and I would be delighted if you could attend the project launch on 22nd October at Aspex at 4pm. Please confirm that you can attend.
I would like to meet the 3 selected buddies for a coffee meeting in Eldon Building Arts Cafe next Wednesday 17th October at 1.30 pm - please also confirm if you are free to attend this.
I look forward to hearing from you.


Tomorrow I will be attending the exhibition at Aspex and I'll meet the other artists. It's all really exciting and will be a massive benefit to have on my CV.

Tuesday, October 16, 2012

Timelapse

With the help of my boyfriend, I created a time lapse of large format experience. It includes both the process of setting up the camera and taking a photo as well as some landscape shots and the gradual movement by the wind or the moving clouds. The link below is the final product, for now. It includes music by Ludovico Einaudi. The video starts off with a beautiful shot of the woodland, and you can see the movement of the sun. It was quite early in the morning, when damp was coming off of the trees, so you can see the rays of the sun moving. It then shows the walk from the woodland to the heathland - indicating how close everything is. Then you can see how I'm setting up the large format camera for a shot in the chopped down area. After this scene you can see a very serene and quite scene where the heathland makes subtle changes. After such a busy scene of me setting up the camera, I thought it would be best to follow that by something very simple. Next is another woodland shot, and you can see a cloud coming over the woodland. Lastly, there it looks at the management on the heathland. Volunteers are actively chopping down trees and removing  shrubbery in order to let the heathland grow. 

I did originally add the video to this post, but the quality came out horrible so here is the link:
Change the quality to HD (1080p)! 


Other tests:

Monday, October 15, 2012

Large Format Shoot 2 Preview

 As you can see from all three of the photos in this post, it was a beautiful day to shoot. I went out shooting at 10 in the morning and it was just all over blue, but also incredibly cold! At about 12 it started to get more and more cloudy. The photo to the left shows the first area I was photographing. It was the heathland stage and I'm right in the middle of the heathland taking a light meter reading. I was shooting with the sun to the side of the camera, and some of the light made strange reflections in the photo, so when I actually took the photo I had to shade the lens.

 The photo to the right is in the cleared area, where I took my second photo. You can see the gopro in the background taking a time lapse of the process of taking a photograph. The large format camera was really interesting and setting up the perfect shot took so much longer than it would with a digital camera, that I thought a time lapse would be great! On the ground you can see all of the stuff I brought with me, including two tripods, the large format camera, slides, the camera bag and the gopro. Luckily my boyfriend was able to help me carry things.

Lastly, this shot was taken in the woodland stage. It is about the same location as the first large format shoot, but because the sun was out the photo would look completely different. Again, you can see the gopro just left of the camera recording the movement of the sun and the clouds coming through. This photo was the hardest to line up because the landscape isn't completely straight and the grass has different heights everywhere. Hopefully it turned out fine.

Large Format Photoshoot 2


I started this Photoshoot at 10.30 in the morning on the 14th of October and finished at 12.30. I took 5 photographs: one of each stage and a second one at the woodland stage. It started off as an incredibly sunny day, however, as the day went on it started to get a bit cloudier. I think this is due to the fact it was a very wet and cold night and early in the morning you could see steam coming off of the plants creating condensation.
1.    Heathland: aperture 22 1/60 second
a.      I started the shoot off in the heathland this time. It was a beautiful and cold morning. The sky was completely clear and the sun was really bright. I shot at a different area of the heathland as I didn’t want to repeat the same photos again. It was a much larger field than the photo from yesterday, but I have never shot of this field before because the sun was always behind it. I decided to use a higher aperture to make sure everything in the photo is in focus. Obviously I can’t go back and check after the first shoot so it’s all about hoping that I got it right.
2.      Clearing: aperture 22 1/125 second
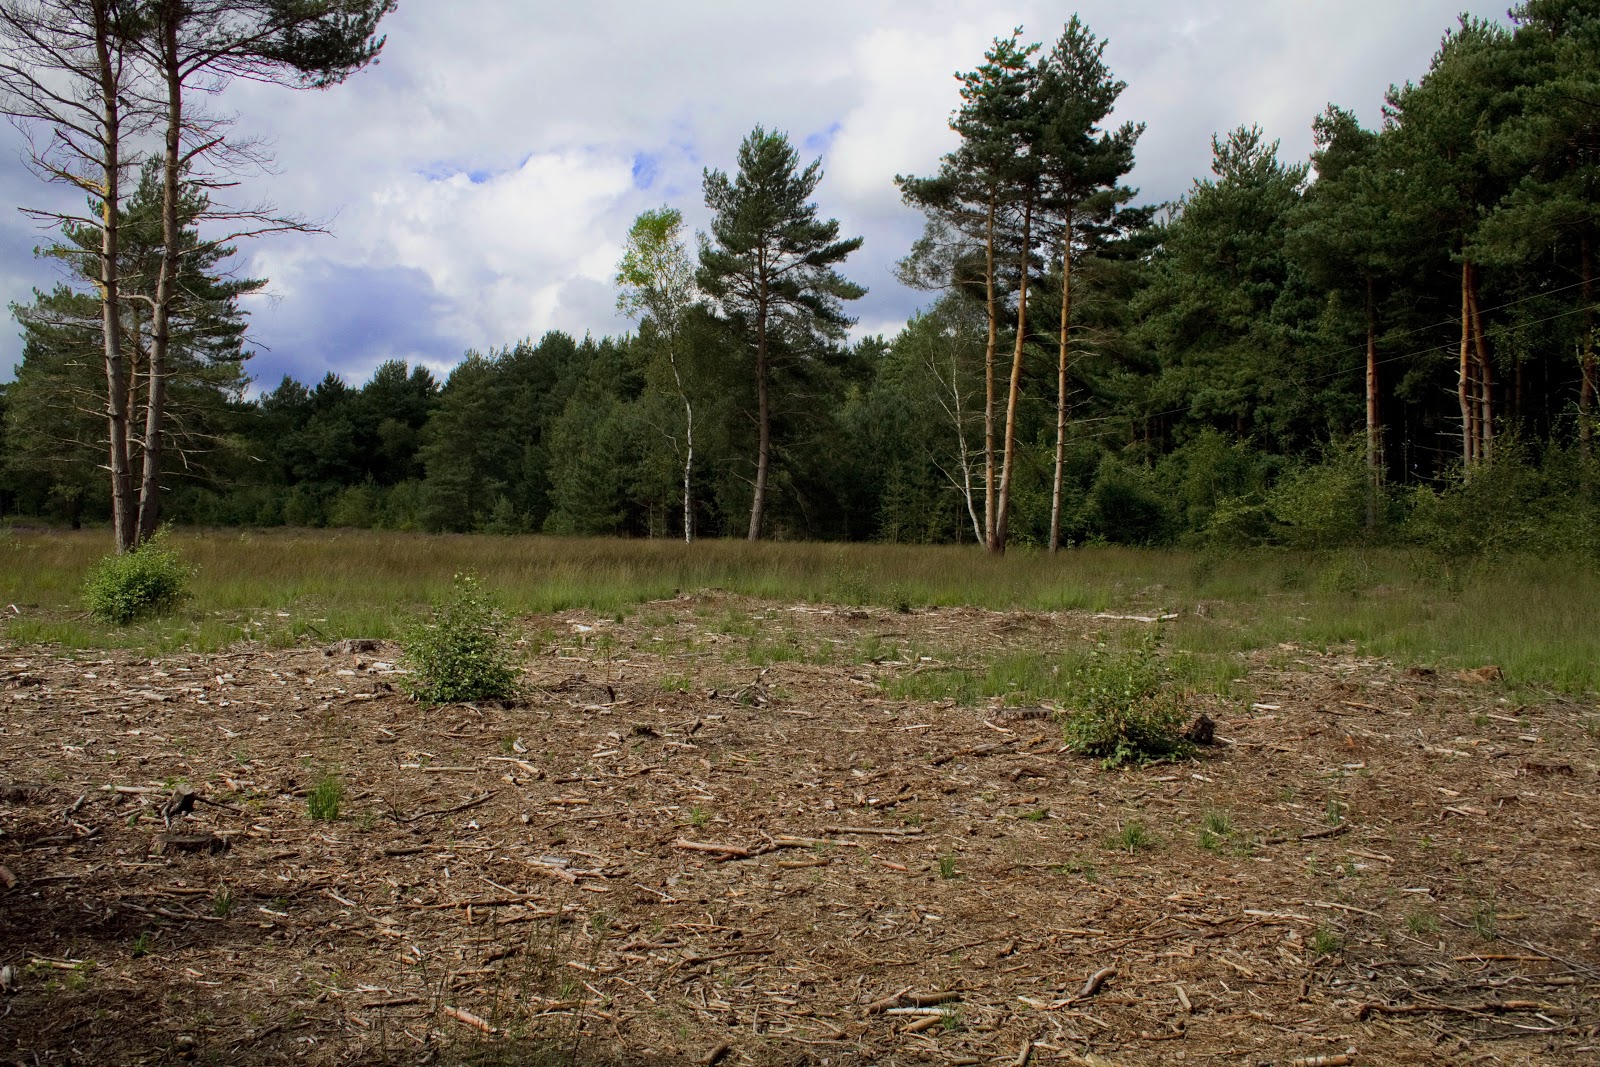
a.      Before the Photoshoot started I looked over all the previous shoots I’ve had so far and I found a photo of the chopped down area that I ended up not selecting as one of my favourites. However, looking back I really love it, so I decided to shoot in the same direction (photo right). Again the sky was completely blue and there weren’t any clouds.
3.      Woodland: aperture 22 1 second
a.      The woodland was quite a tricky area because of the sun and the shadows and trying to get an exposure in the middle. For that reason I took two photographs in the same place using different settings. The first picture needed a 1 second expose according to the light meter, but this is really long, so for the second photo I wanted a bit of a smaller aperture so that the speed would be a bit quicker. Again, I stayed in the same area as yesterdays shoot (photo right) because it was my favourite area.
4.      Woodland: aperture 16 ¼ second
5.      Overgrown: aperture 16 1/125 second
                    a. Lastly, I looked at the overgrown area. I went to a completely different area that I did yesterday to get as much variety as possible – I wasn’t happy with these photographs for ages. At this point the clouds started to come in and created shaded areas. I had to be quick in order to have my photographs in the sun. 

Large Format Shoot 1 preview


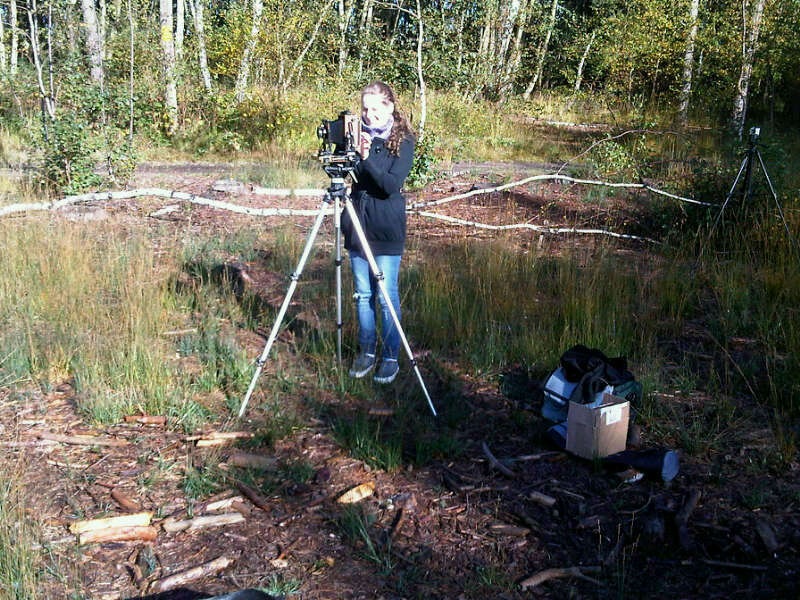
These are some pictures taken during my first large format shoot. They were taken by my dad. Using the large format was actually easier than I expected, but obviously I can't really say too much yet as they haven't been developed. I'll be able to be confident when the pictures have come out... hopefully! The photo to the left is taken underneath the camera cloak. This is what I see when I take the picture. It's upside down, and obviously nowhere near as bright as a camera screen would be! It's quite hard to get everything in focus, especially because to get this view you have to put the aperture on 5.6 (the lowest) but my photos were taken on 16! It's just fingers crossed that everything in my images is in focus! 

The photo to the right is me actually taking the photo shown above. At the moment I'm just lining up the shot and making sure the camera is straight and things like that. When I took the photo I didn't need the cloak over my head. 

Taking the photo is probably the most stressful thing in the world, and before I took the shot I had to take a couple breaths to get rid of my nerves. Obviously I couldn't wait too long because I was working with available light. Anyway, taking the photo is scary, because you've set up the whole photo and you think it's all going to be ok, but really, you don't know what you've got until it's processed! I can't just quickly take a peak to see if everything worked out fine, like you would on a digital camera! This shoot took almost 2 hours and I only took 4 photos. When I used my camera I would take about 100 photos in 2 hours! 

Sunday, October 14, 2012

Large Format Photoshoot 1


The shoot started at 11 in the morning and finished at 12.40 on the 13th of October. It started off as a cloudy day, but as the day went on it became more and more sunny. I took 4 photographs and tried to get similar lighting in each of the photographs. I used an aperture of 16 so the majority of the photograph would be in focus. The shutter speeds varied quite a bit.

1.      Woodland: 1/8 second aperture 16
a.      

I started off with the woodland stage as it was right when I entered the area. I took a photo in a similar location as the photo to the right seeing as this was my favourite location. The day started off very cloudy and thus there will not be any intricate shadows in the photo. Using the large format camera meant that I was much more concerned with the layout of the photograph and I spent a great deal of time making sure the horizon was in the middle and straight.

2.      Heathland: 1/30 second aperture 16
a.      I looked at the heathland stage next. By the second photo I was a bit more confident of the order of things. Setting up the camera went a lot quicker and I was able to adjust the settings a focus with a lot more assurance. The photo was taken in the same location as the photo to the right, but it was a lot cloudier – adding to the deadpan style of photography.

3.      Chopped: 1/125 second aperture 16
a.      

This is when the weather really started to get quite difficult. It became a lot brighter and there were less clouds in the sky. I tried to take a photo when the sun was covered, but unfortunately, the sky in the photo had a lot more blue in it than I would have liked. This photo was taken in the same place as the photo on the right.

4.      Overgrown: 1/60 second aperture 16
a.      Lastly, I looked at the overgrown area. This was the most difficult as at this point the sky was completely blue. Fortunately, there were two big grey clouds coming past so I measured the exposure with the light meter during the first cloud and took the photo during the second cloud. Obviously I checked the light meter settings again just in case, but there was very limited time to take the photo during the shade. Again the photo was taken in the same place as the photo above.

Friday, October 12, 2012

Testing Stage

I had my second group tutorial yesterday and I showed everything the Doug Aitkens inspired photograph. Although some people liked it in this square format, other suggested that I should make it circular instead. I wasn't too sure about this concept at first because all the edges of the photos are completely different and wouldn't connect together, but I tried it anyway - if only to write in my workbook why it didn't work. 
On the contrary, I love the result! Having it in a circular format emphasizes the cycle of it a lot more, and how it's continuous. You can turn the image any way you want and the sequence would still make sense. I used the same photos I used for the square format so I could easily compare them - but they are also my favourite photos. 

Process:
1. Create the panorama
2. Open it up in photoshop
3. Change the canvas size so that the height and width is the same length
4. Rotate the image by 180 degrees
5. Move the image to the top of the canvas
6. Go to the menu bar and click on filter
7. Scroll down until you see distort and click on polar coordinates
8. A screen with some options will pop up, click ok
9. Wait!


I made two of these panoramas, the first one was very small and was horrible quality (image comparison above). To make it better, I made the canvas size 750x750cm. In the end, the circular panorama was just a bit too big to fit on an A3 sheet of paper. I had a really good response from everyone on facebook, so hopefully the lecturers like it just as must! 

Thursday, October 11, 2012

Doug Aitken Inspired


I really like Aitken’s layout of his New Oppositions work. It’s a completely new and interesting approach to landscape photography. A lot of landscape photography is taken in the same deadpan style with a large area and incredibly large prints etc, however Aitken takes it to a whole new level and puts the photos together in one image. His photos are in a cycle – it makes the viewer look at all four photos as one subject. This is similar to my work. I have four photographs and they all result into one statement – succession. However, I was thinking about presenting the four images in a row next to each other, keeping the horizon at the same height in every photo. This way it’s a different kind of cycle.

However, looking at Doug Aitken’s work, I decided to try and recreate his style with my photographs and I love the result! It isn’t perfect as there is a slight white line between the photos where they aren’t completely next to each other, but I love the look of it. I really like the style and how it all works together. These are my 4 favourite photographs and I think they look fantastic like this. I’m considering keeping this style of presenting my work. I think it looks much more interesting.


Doug Aitken


American artist Aitken is probably best known for his work with video, and the characteristics that define that medium are apparent within New Opposition. The photographs do not work as self-sufficient one-off frames but rely on each other for meaning. The optical tricks that the landscapes form when placed together give the impression to the viewer that they are either falling into the centre of the earth of are on top of it looking down as if from the apex of a pyramid. This active involvement by the viewer and the three-dimensional sculptural sensations of the photographs can also be seen in the elaborate installations that often accompany his videos. – Text and images from Susan Bright Art Photography Now

‘The series New Opposition consists of three pieces and was started in 2001. I was interested in the fragmentation of the image. I wanted to formulate an image that was whole but also broken apart. So these are multiple images working as one. I wanted to find a way to blend together different moments in time, different spaces and different locations. I wanted to bring them together in a central unifying image. They are not portraits or cityscapes but more an entropic progression. As the series progresses it becomes increasingly abstracted and denser and you get a sense of motion. The elements in the last image are ones you might just walk past in daily life – there is nothing special about the land. You can imagine someone who is surveying the land taking them. I really like the idea of banality and repetition being used to generate images, which are simple and unobstructed and not captivated by composition.
 The images create a cycle of different places, but they can all be tied together though the central unifying theme of the horizon, which cuts, perpendicular, through them. I was after a three-dimensional quality. Working as well as the ideas of montage and editing, basically filmic concepts, as in repetition. I wanted the eyes to constantly search for the horizon. When the images are brought together they collapse and create a feeling of retreating or expanding.’ – Doug Aitken

Wednesday, October 10, 2012

Clyde Butcher


Last year I went to Miami with my family and we went on a swamp tour in the Everglades. Normally you aren’t allowed to do this, but every year on labour day weekend Clyde Butcher allows the public to have a swamp tour. Butcher owns a property in the Everglades, which is where his Gallery is. The swamp tour was amazing and I got to see a lot of the everglades no one has ever seen before. After the tour, we went into the gallery which was also a shop and got to see a lot of Clyde Butchers work. Some of his photographs were massive, while other were printed quite small. Clyde Butcher was there himself and signed my book. It was amazing to meet him, he was incredibly kind and had some interesting views on photography (which he also mentions in his book).


The photo to the right is called Tamiami Trail #10 and it’s the first photograph in the book. It reminds me of the heathland stage photographs I have. There is an incredibly far vantage point in the photograph, which shows the massive area Clyde Butcher is taking photographs of. Towards the end of the photograph, you can see the growth of trees, which in my photographs symbolises the next stage of succession. The main difference between this photo and my heathland photos, other than the fact these are black and white, is the height of the horizon. You can see so much of the grassland in this photo, which is why it works. If the horizon was in the centre of the photo, just like in my work, it wouldn’t look as good. The reason, however, why I decided to have the horizon of my photos in the middle is because I’m photographing 4 different stages. If the horizon was at this height for a woodland photo it would look horrible, and you wouldn’t see much of the woodland, just of the ground. 

The photo to the left is called Trout Creek #3. The horizon is a lot more similar to what I have in my photos. Again, it looks quite similar to the heathland stage in my photos. The vantage point is very far away, which is what I want to have in my photographs too. The sky is incredibly dramatic. I have had one shoot where the sky is dramatic, but I wasn’t really the biggest fan of it. For this photo, the dramatic sky works. It looks very menacing, while the landscape is quite simple and beautiful. This could imply that the everglades, or landscapes in general are under a great amount of threat due to human activity as well as natural occurrences (such as succession). 


Peter Lik

“In 2003 I completed the biggest challenge of my life – to shoot a 192-page book on the American Landscape. In order to capture the true essence of this vast country, I needed to visit every state and every landmark, though every season. Fifty thousand miles, a thousand rolls of film and five years of my life later I achieved my goal. It was the journey of a lifetime – the most ambitious project I’ve ever undertaken, and I doubt I’ll ever match my incredible experience."

I have chosen a range of photographs to look at. They aren’t my favourites, but I think they match my project. The photo below is one of the first photos in the book. It’s taken in Utah on Highway 163, leading to Monument Valley Navajo Tribal Park. I decided to look at this image because of the straight horizontal and vertical lines and how they repeat so many times within the photograph. The horizon is very strong because it is it completely straight, even in a panorama photo. Then there is the vertical line of the road as well as all the rock formations towards the top of the photograph. The majority of the shadows mimic the horizon. Although my location isn’t anywhere near as spectacular as this, I want to create the same geometric style.
The photo below is taken in California, Redwoods – forest giants, Sequoia National Park. As stated earlier, Peter Lik went to every landmark during every season, and this definitely paid off. It is unusual for this much snowfall in California so the fact that Lik captured this is very unique. This photo has a much clearer link to my photography, obviously I’m photographing a woodland. The trees on the right side of the photograph look quite similar to the pine trees in my photographs, they are completely vertical and add to that geometric aspect I want to portray in my photos. The landscape has got a lot more hills in it than I’d like in my photos. Something that is similar to my photos is the sunlight on the trees and the shadows it creates. In my photos I found the sunlight an important aspect because they make the photo so much more interesting; the shadows create these unique shapes, just like the tree trunk on the left page.
I wanted to show the photo below, taken in Arizona in Monument Valley Navajo Tribal Park, to show the amount of colour he uses in his photographs. Although this isn’t something I’m concerned with for this particular project, I want to keep it in mind because this is the kind photographer I want to be.  
The photo below is called Autumn Palette taken in Vermont. Again, the photo is incredibly colourful, which contrasts with the white birch (?) trees. I wanted to specifically look at this photograph because in the area where I am shooting there are also birch trees. However, I don’t feel this would fit in with my project as it is too close up. I like to have a vantage point in my photos, and here it just seems one layer. The photo does however make use of the repetition of the vertical lines.
 The photo below, taken in Virginia called Woodland Mosaic, fits in perfectly with my project. It’s a woodland of what look like birch trees, just like the ones in Horsell Common. There is a bit of a vantage point, however not as far as I’d like it to be. The photo is incredibly bright and colourful which, similar to the photograph above, contrasts with the white of the birch trees. There isn’t any sunshine on the trees, however, because of the colours of the leaves it looks as though the sun is shining. Another reason this photo is similar to the location where I’m shooting is because of the green towards the bottom of the photo. It almost looks like a carpet. A few of the photos I’m particularly interested in regarding the woodland photos have a grassy ground, which kind of reminds me of the photo below.

Five Thinking Hats


Information
·         Subject Matter
o   Succession – how the landscape changes over time in a  natural way
o   Heathland to woodland
o   Horsell Common Preservation Society
o   Trying to bring the heathland back
·         Genre
o   Landscape
o   Deadpan
·         Medium
o   Digital
·         Opportunities
o   Fergus Heron – building contacts
o   Images could be displayed on the Horsell Common Preservation Society website
o   Educational purposes

Emotional Response
·         Like the idea of it being expressionless
·         Trees don’t have an emotional feeling about where they are
·         Not an emotional subject matter (deadpan)
·         Bad to chop down trees
·         Nostalgia
·         Complicated
o   Both good and bad emotions
·         Using a very different visual approach to an emotive subject matter
o   Juxtaposition
o   Clinical -> emotional
·         Interesting
·         Experiment with different mediums
·         Don’t wimp out!

Creative Thinking
·         Record the process of the trees being cut down and heathland growing back
·         Timelapse (box on a stick)
·         Use text to indicate what has happened
·         Shoot from very low perspective (from the roots)
·         Same view point to shoot from over time
·         Print huge, like a forest
·         Go back over time
·         Expand project to look at all different areas
o   Portraits
o   Animals


Critical Analysis
·         10 year project too long for unit
·         You can shoot stages, but not in the same place
·         Weather – might not be able to do deadpan
·         How can you convey subject
·         Address and research the subject matter so you are clear about your viewpoint
·         Consistency

Positive Reflection and Next Stages
·         Weather – shows changing seasons
·         Timelapse (could shoot digital)
·         Man intervening
·         Add text
·         Current project
·         Keep in touch with contenders
·         Edit existing work
·         Shoot some 5x4
·         Shoot some timelapse

Analysis
I found this approach to a group tutorial quite interesting and very useful. I got a lot more ideas and help from this type of tutorial than any other tutorials we’ve had so far. I was quite surprised by the emotional response I got from some of the people. They were quite confused about the whole chopping down the trees subject. I never saw that as anything bad because it is in such a restricted area and they are doing such small areas at a time. Also the woodchips are brought to Slough Power station. The reason the trees are being chopped is to allow the heather to start growing again and rare and endangered species are able to live. The group argued that surely when chopping down the trees you’d be destroying other communities and ecosystems. Although that is true, there is much more woodland in the area that those communities could easily move. Also, because such small areas are chopped at a time, it means that not many ecosystems are destroyed and need relocating.

The point that was risen was that although I want to photograph in a deadpan style of photography – which is emotionless, almost clinical – this subject can conjure up quite a lot of emotion within people. Thus, it makes the project more complicated. The solution to this is that I need to do a lot of research so I’m able to have a clear viewpoint to argue.

When we started to discuss the creative options I could possibly do, a lot of people thought about the idea of a timelapse or shooting in the same area over a period of time. Unfortunately succession is a very long process, and if I were to come back every day for 3 months, there wouldn’t be much change other than the seasons. However, Daniel still suggested that I look into doing a timelapse, because even the change from day to night shows the landscape changing and the process of time..
Other things that were suggested during the creative thinking stage were that I should add text in order to explain the photographs. It was always my plan to add text, because I think just having the photos on the wall won’t make people think about succession. And the size of the prints was also briefly discussed. Deadpan is usually printed off very large, so I’d have to use a medium where I would be able to print them off so big. Lastly Daniel came up with the idea that I could continue this project and look at different areas, such as the volunteers who actually help restore the heathland, as well as animal or insect photos to show the ecosystems within the heather.

The critical analysis was quite easy. It’s a 10 year restoration program, so doing the project for 3 months is nothing really. So I told everyone about my idea of shooting the different stages in different areas, but trying to shoot them in exactly the same style to make it flow. The weather and seasons were also discussed. The reason I started the project so early was because in September the heather is beautiful and purple and the trees have bright green leaves on them, if I went back now it would look completely different.

Lastly we summed up the project and looked at what steps I need to take next. Daniel and Judy were both very insistent on the fact I should shoot medium or large format. I really don’t feel comfortable shooting in either of these formats, but I will give it a go. Daniel will give me a quick workshop on how to use the large format camera and I can take a few photos (only a few because it’s incredibly expensive). I will also shoot a timelapse. Daniel talked about the idea that my project is very current. It’s not been too long that people have been interested in restoring the heathland and going against succession. Not many people know about it so my project would be quite educational.