Hi everyone!

As part of my photography course, I have to track my development on a blog. The posts from September 2011 until January 2012 are part of a module called Project Management, for which I was required to work in a group of eight students to create an exhibition. The blog followed every step we took in order to create a successful gallery. The blog posts starting from September 2012 follow my final year on the course. I'll be documenting my research and analysis of my final year projects, as well as include notes of my Professional Practice unit - which prepares us for a range of post graduate options. Finally it also looks at a project called New Creatives, where I'll be working alongside an artists to help college students get more involved with art.
Showing posts with label Succession. Show all posts

Wednesday, June 12, 2013

Preview night!!

On the 31st of May was the preview night!!! A couple days before that I emailed my lecturer asking if I could make a time lapse of the event, and he suggested I work with Will Rudman, another student on my course interested in time lapse videos. We got chatting on facebook and decided to work together! He had already filmed a short video of the setting up of the show, so it was a great continuation for him. We went to the exhibition space a couple times to decide on where to put the camera and talked to the technicians about health and safety things. We decided on having one camera above the open exhibition space, which as far as I'm aware no student has ever been! Will's camera was set up there and shot from 5-8. I had my 7D and 1000D on the exhibition floor and moved it around the space. Starting at the beginning where people came in (and conveniently pointing at my work..) and then moved it to the corner close to the bar area, then in the middle and finishing by looking at Will's work. While I was timelapse-ing with my 1000D, Will used my 7D to film some shots of people's work and people looking at the work. Finally, we also had a gopro in a separate room part of the exhibition. It was really great to work with Will and I'm SO happy I didn't do it alone!!! We spent 4 hours on Monday the 3rd of June putting all the time lapse scenes together and creating the most amazing time lapse video I've ever created!! Here is a link for it so do check it out! :)
http://www.youtube.com/watch?v=aepp6JEchwY

Anyway, so apart from filming for the whole preview night, it was fantastic!! I could see people coming up to my work and pointing at it, which is so strange haha. I couldn't spend that much time with my work since I had to keep a constant eye on my camera. However, after the show finished and I was on my way to Gunwharf, I got a phone call from a person interested in my work!! I was overjoyed. We met up a couple days later and chatted for about an hour and a half. It was great to talk to him and hear about his stories and his passion for nature. When I got home from meeting him, I checked my email and someone else was seriously interested in buying my work! Again, overjoyed!!! I will be meeting him either on Friday the 14th of Monday the 17th to discuss prices and things like that. I literally can't believe that I got so much interest in my work and that all my business cards ended up being taken.

On top of all that I got a phone call from Foxtons (estate agents) regarding a graduate job! What on earth!??? I sent my CV and website to Foxtons before Christmas asking for work experience and never heard anything back until now. I haven't been able to speak to Foxtons yet, but unfortunately I won't be able to take the graduate job since I'm going to Australia! However, I was thinking about either asking to work for the month of August, or whether I could just get some work experience with them. That way I would be able to continue in that industry in Australia. It would be fantastic to get a photography related job in Australia, rather than applying for something like Subway again (even though I really enjoy working at Subway).

It's been an incredibly exciting time since the exhibition!!!
VIVA practice and final

On the 14th of May I had my practice VIVA. If you're not sure what a VIVA is, it's basically an oral examination where I have to talk about one of my projects from the final year. It's not my work that is being marked but my awareness of the work. The guidelines included things like what is the context of my project, what research have I done, what theory have I looked at, what experiences have I gained from this project, etc etc etc. And you have to cram it all into 7-10 minutes. I decided to talk about my Succession project as I literally know everything there is to know about succession now. The practice was terrifying. I was surprisingly nervous, even though I practised multiple times! The only thing that threw me were the questions at the end, there isn't really any way you can prepare for that!!

I had my actual VIVA on the 24th of May. I took some notes with me as well as some hand outs for who ever was marking me and two books: Clyde Butcher's and Peter Lik's book. Another thing that was very difficult was the fact we had to do it in front of two people, the first was a lecturer who obviously knows all about our work and saw us progress, but also someone else who isn't part of the photography department and might now know anything about photography. This meant that instead of just saying "a deadpan style of photography" I had to go into what deadpan photography is. Same for the photographers mentioned. Again, all that in 7-10 minutes!!! I don't think I ever talked that fast in my life. I can honestly say I don't actually remember much of the VIVA presentation, and I can't repeat the questions!

Before I walked in I heard my lecturers talking about me saying something along the lines of "The next student is extremely talented" and then them joking around how I'll go far, followed by my lecturer saying "she probably will go far".... WHAT!???? I can't believe I heard my lecturers say that!! When they came to get me I obviously had to pretend I didn't hear anything, but wow!!

Business Cards

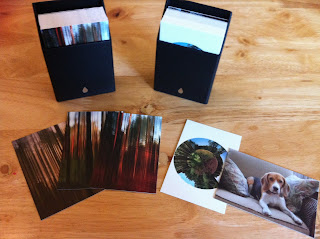
After I got my 40 free Moo.com cards, I decided to actually splurge and pay for 100 cards. I got a set of 50 business cards solely for my 7591 Miles project. I used the three different photos of the series for the three designs of the back of the card. The front just had my name, that I'm a photographer, my website, email, blog and phone number. I printed another 25 cards for my Succession project and 25 of Kayleigh. The reason I printed 25 cards with Kayleigh on it is because I wanted to save those for the summer as I want to do some pet photography then. I put them alongside my exhibition anyway just in case. At the end of the preview night I only had about 20 cards of Kayleigh left and that was it! A couple days I came back and there were only 3 cards left!! I decided to restock with some of the free cards I got, and by the time I added those I only had one card left. It's crazy! I had no idea people would take my cards. I printed 100 cards thinking I could use them over the summer and take them with me to Australia and just cross out my phone number... But no, they're all gone. It's absolutely crazy!

Exhibition Set Up


 I'll start with the Eldon Show set up.  Way back on the 7th of May we started with setting up the show. This included lots of painting and creating 'fake' walls to hang work and a whole load more. Basically getting the space ready for an exhibition. It was a joint effort so for a week and a half everyone came in and helped out. On the 16th of May the setting up had to be ready as that was the first day to hang up our work! We all came in in the morning as it was our professional practice hand in and in the afternoon we came back to hang the work. For professional practice we had to hand in our portfolio (either physical or digital (eg website) as well as our 'final' blog post. I got a 61% got this, so a 2:1. Although I'm not super happy with it, I'm glad it was in the 2:1 mark. In my last tutorial my lecturers weren't very impressed with my portfolio so I was terrified of failing!! After the hand in and the feedback forms, the lecturers basically just sent us home so they could be alone and layout the work. At 2 we came back and oh my goodness!! My work was placed right at the front!! The top right photo is taken from where you walk into the exhibition space. My work is the first you see!! I was so excited that I immediately wanted to hang my work, before they could change their mind.

I asked my boyfriend to come in to help me as diy isn't my thing at all! I bought a whole load of screws and mirror clips as well as a ruler and a screwdriver. Who knew that stuff was so cheap? So we started off by measuring everything very carefully. We almost hung it up wrong! But thankfully one of my course mates set us straight. It probably took us about an hour and half to hang up the first photo... When we started on the second one we got a bit over confident and ended up hanging it about 5cm too high! That was easily fixed though. The third photo was up in about 10 minutes.

It looks like Kevin is doing all the work in these photos, but honestly it was a joint effort! When we finally got all three photos up we thought we were done for the day and we'd do my succession photo the next day. However, my lecturers urged me to keep going and get it all done in one day.


The Succession photo weight about 7kg and the technicians recommended I hang it up with mirror clips. We started off by getting rid of the original hanging method and made new holes in the frame. Pretty scary!! After that we carefully put in the mirror clips. That was the easy part.... After measuring the wall various times and figuring out where everything had to go, my lecturer helped me left the photo while Kevin drilled some more holes in the wall. Letting go of it was terrifying. But it stayed up!!


 I'm super happy with the spot the lectures gave me, and also that both of my work was next to each other. The work is so different, 7591 Miles is a lot more personal and has a more creative approach, whereas Succession is very scientific and precise. Below is a photo of it all hanging up on the wall. It was a very proud moment!


Friday, May 10, 2013

Portsmouth Show Catalogue

As I mentioned in a previous post, there was a bit of drama/confusion about the catalogues presented at the Portsmouth show. Basically, the London show people created a catalogue for the London show, however they also decided to present this at the Eldon exhibition. To the people not part of the London show, it seemed a bit weird as we're part of the show, yet not in the catalogue. Anyway, we got together on Facebook and talked about having our own little catalogue. It''ll only feature about 12 people I think, but at least we'll be in a catalogue!

This is my page! I could only take up one page, so decided to add my Succession print in it. I also added a bit of text and my email and website. I think it looks great! I'm really happy that we're creating our own little catalogue, although I do think it'll come across as a bit weird having two different catalogues, but I'm glad I'm part of it now!


Monday, April 15, 2013

7591 Miles Finals!!

Today I went to Brighton to pick up my other two final prints for the Eldon exhibition. It feels like the millionth time I've gone to The Vault, but they're lovely and have done a fantastic job with all of my prints. The photo to the right are all three of them. They literally look beautiful. The colours are so bright and having them printed shows so much more detail than when I see them on my screen. The orange and the green in the third photo are so vibrant which relates back to the bold red in the first photo.
 The photo to the left is just a detail shot of the mounting and the paper. It's printed on matt paper and has a seal over it which looks really nice and feels smooth too. I think it's fingerprint proof, but I'm not 100% sure. The diabond mounting is very light and sturdy. I can't wait to put these photos up in the Eldon exhibition alongside my Succession photograph.

This might sound a bit cheesy, but I'm so proud of myself for finishing these two projects. Both of them used large format film, something I never thought I'd ever use, let alone enjoy! I also started playing around in the film-making world by creating time lapse videos, which is something I'm hoping to continue. Both of the final projects are beautifully presented. The Succession photo looks a million times better in its frame, and these three 7591 Miles photos also look a lot more impressive printed and mounted.


Wednesday, April 3, 2013

Business Cards

I've been going a bit crazy over free samples lately. I've order anything and everything ranging from make-up samples and moisturisers to puppy toys! One of the many many things I ordered are business cards from Moo.com. Moo is an online company that specialises in professional looking business cards for reasonableness prices. I desperately need some new business cards as I ordered mine from Vista Print for very cheap and they aren't very good quality (Card Paper). I've also got an image on it that isn't even in my portfolio anymore!

Anyway, so then I came across Moo's free business card samples. You could order 10 cards for free with free postage and everything. This is where the crazy part comes in... I got them sent to 4 different addresses so I managed to get 40. I sent one pair to my flat in Portsmouth, one to my parent's house and one to both of my boyfriend's parents' house.

3 out of 4 are now at my flat in Portsmouth and I will be collecting the last set sometime in the near-ish future. First I ordered some "Pet Photography" business cards, since I'm very interested in that field at the moment. They look beautiful. The quality of them is amazing, they are very thick and smooth business cards and have got a matt finish to them. The second set I ordered is of my 7591 Miles project. It's simply got on photo on the back. The third set I ordered was my Succession photo. I originally wanted to have the circle on the back, but I have having all sorts of problems, so I just put it tiny on the front to get the idea, and then the clearing photo on the back. I quite like it this way because I love the clearing photo, and it shows the quality of the photograph. Finally, I printed my ducks. At this point, I figured out that you can choose multiple designs for the cards, so I chose 4 different photos (3 blue, 3 purple, 2 red and 2 yellow).

When I order my real business cards (I won't just live off of free samples...) I reckon I'll create several different designs to show the range of photography I can do. I'll probably order 100 cards and choose maybe 5 different projects? I haven't quite decided yet, I wanted to have a look at the quality first.

I don't expect to get rid of all of my business cards during the Eldon show, so I will be using them in Australia too, although I'll just have to cross out my mobile number and write a new one. Or maybe.... order another few free samples to various different addresses. Neighbours??


Monday, April 1, 2013

March

It's time for my monthly video! It's something I've been doing since January, and basically every month I take a whole load of photos/videos/time lapses and I put them together in one video at the end of the month.
January: http://www.youtube.com/watch?v=krNZrlufyUA
Feburary: http://www.youtube.com/watch?v=q6BtKr06yTs
March: http://www.youtube.com/watch?v=1i15xhVqT6U

March has been pretty busy! It started off with me going to the Artful Dodgers in London, and also visiting the BEST burrito place in the world (at the westfield in stratford). It basically works like subway, but then it's a wrap and it's filled with all sorts of tasty things. I love it. So I took a photo of it to show everyone how incredibly full it is! I then photographed a tribute band called The Bootleg Beatles, who dressed up like the Beatles and sang their songs. I accompanied Lauren Whatling as it's one of her projects and it was great fun! I do have a few blog posts about the experience, but I really enjoyed that. At the end we also received their autographs which was very exciting.

That was then followed by New Creatives! New Creatives is a project I've been working on since October 2012 where I worked alongside an artist, Oliver Merkin, and we went to Portsmouth and Havant College to help students with their art work. It was then displayed at Aspex Gallery in Gunwharf. I first took a time lapse video of the curation of the show, which was then displayed at the exhibition, and that's followed by some photographs of the preview night taken by Lauren Whatling.

The video then continues to show some of the work Kevin and I have been doing, so it includes my dissertation, which I handed it at the start of this month and Kevin's dissertation poster which he got a fabulous 2.1!

I then went to my parent's house for a couple days and photographed my parents' beagle multiple times. She's a great model, but also very naughty. I've got a photograph of her holding some stolen chopsticks. Of course, I couldn't leave out my little hamster, Chili! Who is also a massive poser.

In between my Kayleigh shots and Chili shots there is a photo of my with a giant suitcase. I bought myself a huge huge huge light weight suitcase for £40, which was quite a good deal as it was meant to be double that. It's literally gigantic. Which is good, because I've also done a whole load of shopping to fill it up with.

I then went to the circus in Portsmouth. I received some free tickets from Subway since we let them advertise. It was a great show! I took a whole load of photos but also some timelapses! It was surprisingly difficult since I had to use a really slow shutter speed, but the time lapses have turned out quite nice actually!

Finally, I also got a whole load of stuff done for uni. My Succession photo has been framed and is hanging up in my parent's house. It looks amazing!! It looks so much more professional and expensive now it's framed (which it should do....). I also got my 7591 Miles photo printed and mounted on diabond. I love it. It looks fantastic. However, my lecturers like it too, which could be seen as a positive, but they want my to print the other two photos in the series exactly the same..... That's pretty pricey.

Anyway then the video finishes with some more shots of Chili, who really did not want to be photographed and tried to escape.

Saturday, March 23, 2013

Framing/Presenting

After a bit of a stressy start of the day, thanks to the snow, I managed to pick up all my finals! First we went to the framing shop in Woking where I got my Succession photo framed. As mentioned in a previous post, I wanted to have a white frame, not too thick of overpowering, and a circular mount so it wouldn't be too layered. I wasn't too sure about the circular mount, but it looks amazing! In fact, it doesn't actually look like it has a mount, which is good, because nothing distracts you from the photo itself.


The top right and the middle left photo are both of the succession photo. You can't see the photo itself very well because of all the lights. I'm so so so happy with the white frame, I think if it was a black frame the photo would have looked a lot smaller and enclosed and the frame would be a main focus point. The glass looks beautiful as well. It makes the photo look very expensive (which it is...) and the glossiness of it makes the photo look more 3 dimensional.

The photo to the left is just a close up of the mount and the frame. It looks beautiful. Unfortunately I could only see the photo for a few minutes before it got wrapped up and put in the back of the car.


We then drove to Brighton to pick up my A2 photo for my motion blur project. I should really start to refer to it as 7591 Miles as it sounds so much more professional. Anyway, this also looks fantastic!! I printed it on matt paper so it wouldn't look like one giant mirror and it's mounted on diabond. The mounting is literally gorgeous. I'm so happy with it!! Diabond is basically the same as aluminium mounting, but a lot lighter in weight.

I can't really find the right words to describe it all, because both of these projects are the most professionally presented work I've every created. My Succession photo will be up in the Eldon exhibition in May/June, 7591 Miles will be handed in as my final for this project.

Thursday, March 14, 2013

Succession Framing

Because I’m going to be presenting my Succession project for the Eldon show, I need to get that professionally presented. I had mounted it on thin mount board as that is all I could afford, but with the help of my parents (and because they want to hang it up in their house) we decided to get it professionally framed. We went to a framing shop in Woking to see what they could offer. Basically what’s going to happen is it’s going to get a white frame, as I didn’t want it to take away from the photo itself, and it’s going to have a circular window mount, so it doesn’t look too layered (first the white border of the photo, then the window mount and then the frame). Finally, it’ll have a glass front. It’ll be done in a week or so, but unfortunately I won’t be going home anytime soon so won’t see it for a while!! 

Friday, February 1, 2013

Business Boom

"Business Boom Collective is the ideal place to see features of up-and-coming and freelance creatives from the UK and beyond. In collaboration with a collection of modern and slick websites including Business Boom Bolton, The Mancunianist as well as our latest store feature, I Think I Need I Want, it is the perfect place to read up on the brightest individuals and most current businesses linked to the worlds of fashion, photography, art, design and more."

Everyone kept telling me how great Twitter was and such, but now I've experienced it first hand. One of my friends on the course retweeted a status by Business Boom and having your work featured on their website. As an up and coming photographer who's trying to make it out, of course I'd want my work featured! I immediately sent them an email with my website and within a couple of hours they replied that they really liked my Rubber Duck series and they'd "love to put something together for you". They asked me to write a bit about myself, my education, inspirations, aspirations etc. I've just written a short piece including a bit about my rubber duck series, my The Netherlands photos and of course my Succession project. I can't wait to see what it all looks like!! 

Tuesday, December 18, 2012

Hand-In


Due to extenuating flat circumstances, see right photo, I was able to hand in my work a couple days early. Which ended up being much better than handing everything in on the day because there are always massive queues of everyone wanting to hand in their work at the same time. The photo below is of my final piece. The photo has been mounted on the 83x83cm mount board and the piece of text text to it, also in a square format, has been mounted on a smaller piece of foam board. I also handed in two copies of my reflective writing - where I have written about how I'd like to present it if I had all the money in the world, my development workbook and my research workbook. I will only receive my marks in February, so it's a long long wait...

Wednesday, December 5, 2012

Succession Text

Succession
By: Elaine de Vries

“Bare land almost never anywhere on the planet does not stay bare for very long. Plants very quickly start to colonize the bare land and over time an entire plant community develops... Ecologists call this process succession.” (Rutherford J). For this project I looked at the process of succession in the English landscape, specifically at Horsell Common in Surrey. The majority of England used to be covered in heathland, however over time 80% of heathland has been lost, mainly because birch and pine trees started to take over (www.horsellcommon.org.uk). Their growth created shade which ultimately resulted in the heather dying due to lack of photosynthesis.

Horsell Common has a preservation society that is concerned with the loss of heathland. The society clears specific areas of woodland in order for dormant heather seeds within the soil to grow. The reason for the restoration is to create a habitat for the 5,000 different rare species who can only survive in heather. The society has set up a 10 year plan to re-establish fields of heather and thus the Common has various stages of succession including a cleared area, heathland, overgrown areas and woodland. I documented these four steps to create a photographic piece of work as well as a timelapse. Because succession is such a long process, I was unable to take all four photographs in the same area. Therefore, I took every photo in exactly the same style – making sure that the horizon of each photo was exactly the same. To get the most precision and detail possible and no lens distortion, I used a 5x4 large format camera. 

The process of succession is an endless cycle. When the area has been cleared, the heather starts to grow. However, since the area is still surrounded by woodland, their seeds fall onto the heather causing trees to grow. Over time, the trees take over the heather and the Horsell Common Preservation Society would have to chop down the trees again. I wanted to emphasize this concept in my photographic work and therefore put four photographs of the different stages in a circular format. The image could be looked at from any angle, and it would make sense. For my time lapse I portrayed the idea of succession being endless by making sure the order of the scenes reflected the order of succession as well as looping the video. The main idea of the timelapse was to create a context for the work as well as presenting to the viewer that succession doesn’t happen in a day. 

Monday, December 3, 2012

Time Lapse Final

Change quality to 1080p!!!

http://www.youtube.com/watch?v=SS_2iHZFdUc

I have finally finished the video! I received a few music samples from my brother and decided on the second one he sent me. I think it works really well with the video, I especially like the start where it's quite calm, and in the final scene (of the first loop) it starts to build up.

80x80cm Print

I originally wanted to print my picture acrylic mounted, however after quite a few tutorials Judy and Daniel both said that they'd prefer it if the picture was printed off massively. Having already spent lots and lots of money on printing pictures, I wanted to look for somewhere affordable. I came across Jessops photo printing service where they print XXL posters in a square format and decided to go for the 80x80cm print.
I picked it up from the shop in the biggest tube I've ever seen, and when I got home it looked fantastic!! I'm really happy with the outcome and definitely prefer it being this size. You can really see all the detail in each of the four photos. It's printed on a semi gloss paper, as Daniel mentioned he thought the glossy print I printed was too glossy and the matt didn't look as good. 
The next issue is.... how will I present it? We always have to present our work in a professional manner, so just having this print hanging on the wall wouldn't give me a very good mark. I spoke to Judy he mentioned all these really expensive things, that would look great, but with the size of my print would be over £100. I did some of my own research and found a company that sold massive pieces of foam board. I double checked the size of the print, as on the Jessops website it warned you that the print might come out slightly bigger, and good thing I did, because it's actually about 82x82cm! I ordered a foamboard and with their special cutting option asked for it to be cut 83x83 (so there is room for mistakes). It should arrive tomorrow morning! 

Tuesday, November 20, 2012

Twisting


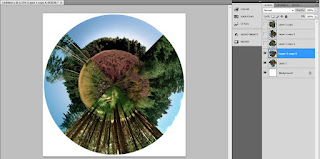
While I was asking people to comment on which image they prefer on Facebook, someone suggested that maybe I should turn the image so that the lines aren’t horizontal and vertical. I decided to test this out, as it’s something I hadn’t thought of before. As the image above shows, I copied that first layer (the original image) four times and twisted the image so that each different photo is up. I still had to bear in mind the sequencing of the image. Although it’s a continuous cycle and any image could come first, I didn’t feel like the overgrown stage could go up as that was really a middle stage, whereas the other three could be a starting point. I didn’t like having the trees pointing down or up so that only left me with one image: having the clearing up. I definitely like the look of it. I am so used to seeing the image with the horizontal and vertical lines that it’s quite weird to see it tilted, but I do prefer it looking like this.

Sunday, November 18, 2012

Fixing images


At the tutorial it was suggested that instead of printing my image on acrylic I should go for a really blown up version of the print. I put my image into an A1 sized document in photoshop and zoomed in to 100%. This allowed me to see little dots and hairs on the film I didn’t previously see because of the size. The top image is the edited image where I got rid of any odd marks, and the bottom is the original image. It’s quite hard to see the difference, but there are some obvious marks I removed. I slowly went through every section of the photo and made sure everything was gone.

Testing Brightness


I went to get my images printed professionally in order to double check the brightness of the images. These are 5 tests and the original image. They have all been brightened in different ways so I added the number of the image to the top left corner so I could identify which one printed best.

I think 2 and 3 have the best outcome. They both look bright enough without having blown out the detail in the sky or of the landscape. 

Square vs Circle


After Daniel telling me several times that he prefers the square image, I decided to use my facebook page and see what other people had to say. I posted a post explaining a little bit about my work and asked if people could comment on which one they prefer. Lastly, I added my blog so people could have a look at what my project is about. First I posted it on my photography page, and then shared in on my facebook page. My brother and mum also shared it so I got a wide audience looking at the images in several different countries. A few people that I don’t even know commented on it too!

After the image being up for 24 hours, I took a snapshot of the results. Everyone wrote that they preferred the circular image to the square.

I prefer the circular image too, I think it’s a lot more interesting to look at and people want to know more about the subject matter. I wrote quite a while ago that I wanted to teach people about succession, and in order to do that I have to create something visually interesting – something that grabs their attention. Clearly, the circular image in much more popular, and I think if both of these images were in a gallery, people would be more inclined to read the accompanying text of the circular image rather than the square image.

Sunday, November 11, 2012

Testing Brightness


Getting the brightness right of the photos has been a bit of a pain. The photos are coming out slightly dark when I print them myself, but nowhere near as dark as other companies have printed them. Because I want my final to be acrylic mounted I will need to get it printed somewhere. 

The photo above shows how I’ve been slightly changing the brightness in every photo. You can’t really tell a massive difference because of the quality of the photo (taken on my iphone). The largest photo is the print by photobox, and the smallest one is by white wall, the acrylic print. The rest have been tests. Nothing has come out as dark as the print from photobox, which is a bit odd, and therefore it’s hard to change the brightness as I don’t understand why the print has come out so dark in the first place.

I started off by just brightening the whole image (top left image on the sheet of 4), but it completely got rid of the colour in the sky. After than I started brightening each photo individually. I lost quite a bit of colour in the heathland and so while brightening I also added colour so that none of that detail would be lost.

The print with two images on it, is (for now) my final. The image on the left is the original (as you can see it’s not as dark as the photobox print) and the image to the right is the newly edited version. There is still enough colour in the photo, and it has also been significantly brightened. I might get some 6x4 prints from photobox in order to test whether the brightness has worked, before I think about ordering my final print.