Hi everyone!

As part of my photography course, I have to track my development on a blog. The posts from September 2011 until January 2012 are part of a module called Project Management, for which I was required to work in a group of eight students to create an exhibition. The blog followed every step we took in order to create a successful gallery. The blog posts starting from September 2012 follow my final year on the course. I'll be documenting my research and analysis of my final year projects, as well as include notes of my Professional Practice unit - which prepares us for a range of post graduate options. Finally it also looks at a project called New Creatives, where I'll be working alongside an artists to help college students get more involved with art.
Showing posts with label Time Lapse. Show all posts

Sunday, April 27, 2014

Time Lapse: Yarra River

Right, finally time to start blogging about my time lapse. I have been working on my time lapse for about 4 months now, so I have a ton to catch up on with that too!! I few bits have already been mentioned in previous posts, such as the botanic gardens and luna park, so I won't go into that again.

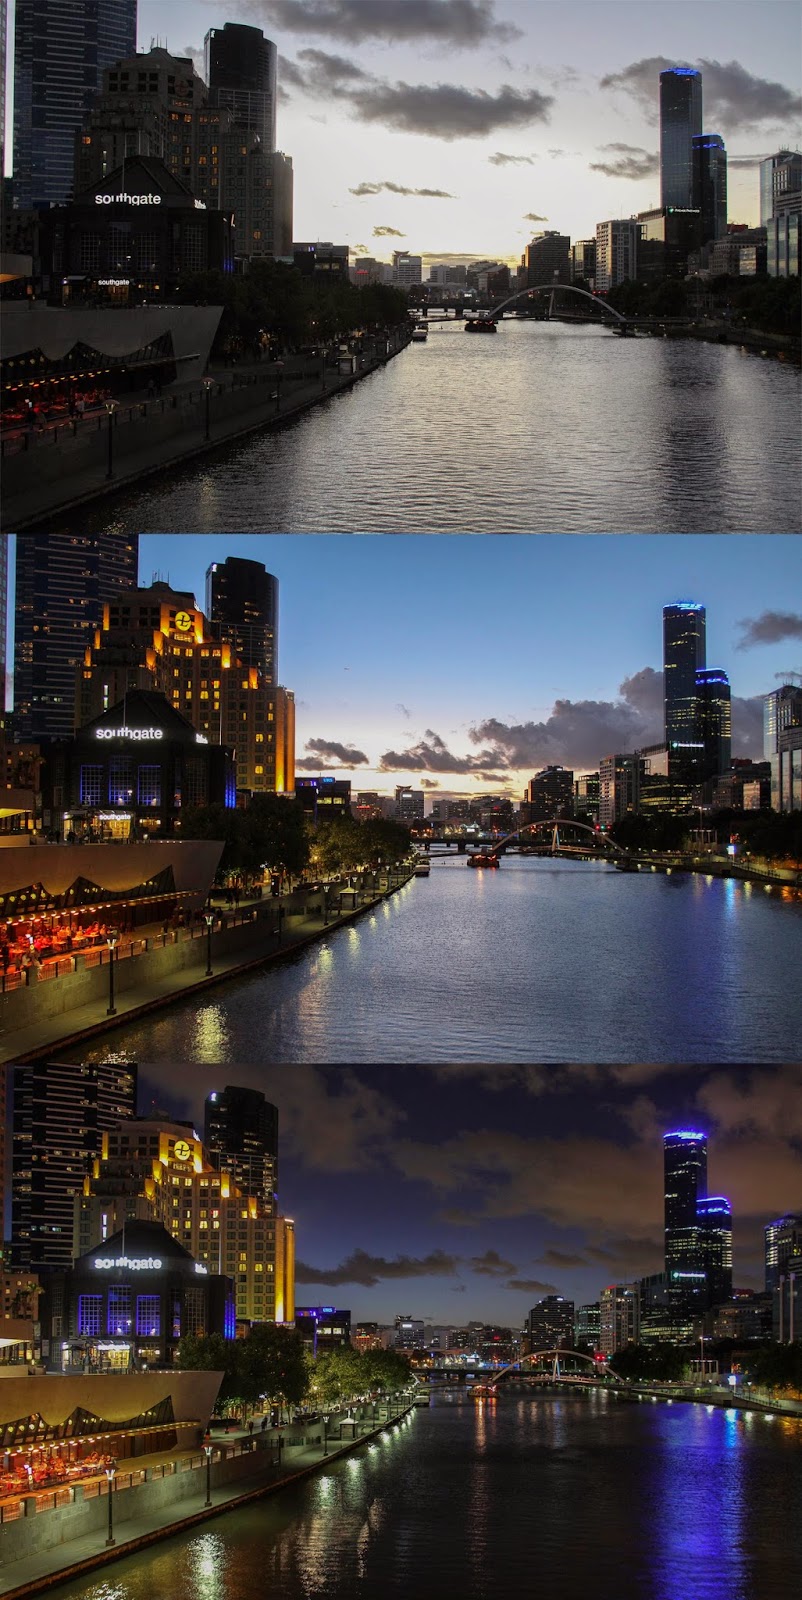
I started off with shooting sunset scenes. I always find sunset shots to be the most interesting and attention grabbing. They're also my favourite kind of time lapses. I like how, along with all the other movement, it starts to get darker and how buildings start to light up. Melbourne is a very colourful city so for the night shot I wanted it to be a scenic view of the city overlooking the Yarra River for reflections.

This posts will have quite a few photos that are small. Click on them to see them full size. The map below shoes where I've taken my photos for this post.


My first try was on the Princess Bridge - the red dot on the map above. It turned out beautiful! It went from a light blue/white sky, to a medium blue/yellow sky, to a dark blue sky. The clouds were a very drastic orangey colour. The lights on the southbank and buildings in the background started to light up introducing even more colours. The only thing that didn't work was that I forgot to put my camera into manual focus. Unfortunately there was a slight camera change. Some people didn't notice it, but it too obvious for me and I know it would irritate me if I'd put it into the final piece.

Here is the scene from the time-lapse:
https://www.youtube.com/watch?v=Few5H2ddsW4

Although this is a really iconic view of Melbourne, I didn't feel like it really showed Melbourne. So I tried out some other locations.

The second time lapse I took was much further down the Yarra River at Swan Bridge - the blue dot on the map. This looks directly at the CBD and had a beautiful reflection in the river. I think the composition of this shot is beautiful. The CBD is right in the middle of the photo with its tall buildings, and the edges of the frame are much quieter meaning the focus is only on the CBD.

The time lapse was on for about 30 minutes taking a photo every 5 seconds. Although you can't see the glowing sunset from this angle, you still see it going from light to dark. I decided to stop it before it was pitch black so that I could connect another sunset time lapse after it from a different angle.

So the third place I went to was on top of Hammerhall, one of the two theatres in the Arts Precinct - the purple dot on the map. You can actually get on top of the building where you'll have a stunning panoramic view of the city. Not many people know about this area as it's a bit hidden away, so it's always empty! Anyway we started this time lapse a little too late so it was already pitch black outside! I decided to shoot it anyway to see how it looks and maybe come back another day and shoot it earlier.

The photo looks directly at the CBD from another angle. You can see the princess bridge and the cars/trams crossing it. Behind that is Federation Square and in the corner you can just see St Pauls Cathedral, which creates a nice contrast with the skyscrapers. On the day I shot this time lapse the olympics were showing on the large screen in Federation Square so that area actually changes colours from the screen. It looks really interesting in the time lapse.

I really liked how this shot turned out so instead of coming back and shooting it again earlier, I decided to shoot in a third location - the pink dot on the map. This is located just along the CBD side of the Yarra River and a little bit further down, but not quite as far as Swan Bridge. There is a little area that slightly sticks out where you have another beautiful view of the City, but this time the other side of the river. I really wanted to have a shot including the Eureka Tower as that's the tallest building in Melbourne. The pointy tower next to the Eureka tower is where the Arts Precinct is so I also wanted to include that in the shot.

I actually had a really hard time shooting this time lapse. The first try it started off beautiful, but as time went on it started to get incredibly cloudy. It wouldn't have been a huge problem, but the clouds brought light pollution, changing the colour of the photo from blue to orange. It wouldn't fit in with the rest of the shots I'd taken so I decided to go back a few days later and reshoot.

The second time I tried people were setting up for the Moomba Festival, the largest free community festival in Australia. There were bright lights behind us turning on and off and I think that messed with my camera so throughout the entire time-lapse the shots were flashing. I'm not sure if you can see it in the photo to the left - the top photo is slightly lighter than the bottom - but in the time lapse sequence it was very obvious.

Finally third time lucky! It was a completely clear night, no builders behind us and the water actually had a much better reflection. It was perfect - and thankfully it was because this was going to be my last try! Melbourne weather is pretty up and down so trying to shoot on an almost cloudless day was pretty difficult. I didn't want to waste all the cloudless evenings on the same shot that kept messing up!

That's it for the night time/sunset Yarra River shots. I've really happy with the three sequences and they fit together really nicely!


Thursday, April 3, 2014

Ludovico Einaudi

All my recent posts seem to be updates. I keep wanting to start blogging again, but every time I don't end up sticking to it. Well, I'm officially starting again! I have a lot to write about and I need to get it all posted before the end of this month. On April 30th I'm flying to Sydney and will be spending the next 4 weeks travelling up the east coast all the way to Cairns. Then from Cairns I'll be flying to Tokyo and 5 days after that back to the UK. It's bittersweet to think about it, on the one hand I absolutely love living in Melbourne, it's such a beautiful place, but going back to the UK won't be THAT terrible. It's a lot cheaper and we'll actually be able to get the jobs we want. We were very limited here with the working holiday visa rules.

Anyway, these next couple of posts will be looking at what I've been up to for the past 6 months.

Now to the point of the post: Ludovico Einaudi. Einaudi is a famous Italian pianist and composer. I was first introduced to his music by my boyfriend and immediately loved what I heard. I used it as the music for quite a few time lapses, before I ended up changing it to something else (eg. the music my brother composed for me). It's such beautiful and intense music and perfect for time lapses! Spoiler alert: I've been busy for the past couple of months to create a Melbourne time lapse and guess which music I'll be using?!? Anyway, a while back I saw a poster that Einaudi was going to play at Hammerhall in Melbourne, only a 10 minute walk away from us. I was super excited but didn't think much of it at the time, I love his music but don't know whether it would be worth the money. A couple weeks later I started my Melbourne time lapse and starting thinking about music, obviously Einaudi. I remembered the concerts and immediately checked the tickets. I am so incredibly happy that I went!!

The concert was on the 13th of February and was based around his new CD called In A Timelapse, fitting name right? Einaudi played alongside 5 other musicians including 2 fantastic cello players. The music starts off calm and beautiful but the songs build up into this intense creation. Seeing it in person was a completely different experience. As the music builds up, the lighting also became more dramatic. Amazing.

Unfortunately I couldn't take any photos or recordings, but at the end I managed to get a shot of Einaudi. After that I bought a CD and….. got it signed!!! Amazing.

Monday, July 1, 2013

Portsmouth Time Lapse

Over the past month or so I've been wanting to do a time lapse of Portsmouth. I was inspired by Will Rudman's 24 hours in Portsmouth video which he created in the winter time. As we were editing our Portsmouth show time lapse we had a chat about it and now I finally got round to starting it! I've been going around Portsmouth for the past couple of days taking time lapses as well as videos and putting them all together in Windows Movie Maker. I don't really recommend using windows movie maker if you're using more that 3 files..... it's constantly freezing and muting the sound..... not ideal!! But anyway, with a lot of patience and restarting laptops etc it's ok.

I started off shooting at Southsea Common, near the beach. It was an absolutely beautiful day, and just busy enough to make the time lapse interesting. I positioned the camera so that you look straight down a path leading to the sea. There is also a lovely dog in the photo. I stayed in this location for about 5 minutes and took a photo about every 10 seconds.

I next strolled to the actual common and war monument. It's a huge field and I really wanted to show that in the time lapse. Since it was such a great day, there were quite a few people walking their dogs and having a bbq. There is a lot of movement in this scene, there was one moment where a whole load of birds went crazy, but unfortunately that was only captured in two photos so you can't really see it in the time lapse.
After that I went to the sea front. It was quite busy, so finding a spot where people wouldn't be in the scene was difficult. There were a lot of little sail boats everything as well as the huge ferries. The photo to the right shows a little sail boat that stood out against all the blue and white. It went ultra slow, and is then very quickly overtaken by a ferry! It's hard to explain but it looks great in the time lapse, I promise!
I then strolled to Albert Road. Not much was happening at the time, so I mainly took videos instead of time lapses. I did take this time lapse looking straight at the King's theatre. It reminds me of the framing of the first scene, with a road leading the eye toward the middle of the photo. I also like how on the top right you can see the sign "Albert Road".


This is a scene from quite while ago when I started the Portsmouth project. It's a scene from outside the bedroom window. It sounds a bit lazy... but I love it! In the time lapse you can see the shadow on the building to the left slowly rising. It looks really interesting. In the background you can also see a few ferries come by.
Towards the evening I went to the historic dockyard and took some really beautiful shots there. This first one is of the back of the spinnaker, a view that isn't as stereotypical. The sky is starting to turn a bit pinky/purpley which looks really nice. In the foreground there are some boats, which adds to the whole Portsmouth is an island concept and just behind that is Portsmouth Harbour station.

This shot is taken from the same location as the previous photo, but turned into a different direction. The pink sky is incredibly throughout this whole time lapse scene. I actually shortened the time lapse of the spinnaker because of the pink sky, but also because I love the way boats look on time lapse videos! I like the contrast between the little boats and the HMS Warrior. You can also see the little ferry going back and forth between Portsmouth and Gosport. This is definitely one of my favourite scenes.
I completely forgot to add this in. I also went to the Guildhall (obvious). I despise the fact that straight across from the Guildhall is a statue of Queen Elizabeth, and I'm sure any photographer would agree with me. Because of that statue, you can't take a front on geometric photo of the Guildhall! Anyway, I ended up taking a video there instead of a time lapse. A few people came up to me and posed for the camera, unfortunately that won't be part of the time lapse...

Lastly, another shot at the Historic Dockyard. This was complete luck. I left the flat at about 8.45 because we googled the sun would set at 9.21. When we got to the dockyard it was about 9 and the sun was quickly setting. I was lucky enough to get quite a long time lapse of the sun sinking behind the HMS Warrior. This shot is about halfway through in the time lapse. During this time lapse a huge ferry went by as well, which looks quite interesting, the whole new vs old thing.

Obviously I only added the stills from the time lapse in this post, but I did create a lot of videos as well. I really like the idea of combining still images with moving images, it brings the video alive. I will be doing some more shooting tomorrow. I will be going to Commercial Road, maybe down to the southsea shops and Gunwharf. Gunwharf has actually got a no photography rule..... which is a bit stupid.... but I'll have to go hide my camera somewhere so I won't get caught!!

Wednesday, June 12, 2013

Preview night!!

On the 31st of May was the preview night!!! A couple days before that I emailed my lecturer asking if I could make a time lapse of the event, and he suggested I work with Will Rudman, another student on my course interested in time lapse videos. We got chatting on facebook and decided to work together! He had already filmed a short video of the setting up of the show, so it was a great continuation for him. We went to the exhibition space a couple times to decide on where to put the camera and talked to the technicians about health and safety things. We decided on having one camera above the open exhibition space, which as far as I'm aware no student has ever been! Will's camera was set up there and shot from 5-8. I had my 7D and 1000D on the exhibition floor and moved it around the space. Starting at the beginning where people came in (and conveniently pointing at my work..) and then moved it to the corner close to the bar area, then in the middle and finishing by looking at Will's work. While I was timelapse-ing with my 1000D, Will used my 7D to film some shots of people's work and people looking at the work. Finally, we also had a gopro in a separate room part of the exhibition. It was really great to work with Will and I'm SO happy I didn't do it alone!!! We spent 4 hours on Monday the 3rd of June putting all the time lapse scenes together and creating the most amazing time lapse video I've ever created!! Here is a link for it so do check it out! :)
http://www.youtube.com/watch?v=aepp6JEchwY

Anyway, so apart from filming for the whole preview night, it was fantastic!! I could see people coming up to my work and pointing at it, which is so strange haha. I couldn't spend that much time with my work since I had to keep a constant eye on my camera. However, after the show finished and I was on my way to Gunwharf, I got a phone call from a person interested in my work!! I was overjoyed. We met up a couple days later and chatted for about an hour and a half. It was great to talk to him and hear about his stories and his passion for nature. When I got home from meeting him, I checked my email and someone else was seriously interested in buying my work! Again, overjoyed!!! I will be meeting him either on Friday the 14th of Monday the 17th to discuss prices and things like that. I literally can't believe that I got so much interest in my work and that all my business cards ended up being taken.

On top of all that I got a phone call from Foxtons (estate agents) regarding a graduate job! What on earth!??? I sent my CV and website to Foxtons before Christmas asking for work experience and never heard anything back until now. I haven't been able to speak to Foxtons yet, but unfortunately I won't be able to take the graduate job since I'm going to Australia! However, I was thinking about either asking to work for the month of August, or whether I could just get some work experience with them. That way I would be able to continue in that industry in Australia. It would be fantastic to get a photography related job in Australia, rather than applying for something like Subway again (even though I really enjoy working at Subway).

It's been an incredibly exciting time since the exhibition!!!

Tuesday, June 4, 2013

Officially done with University

It's been a little while since my last blog post and that's because of my hand-in. Our "final" blog post was marked (previous post) so I couldn't blog until I got that mark back, which I've got back now!! The blog and my portfolio were part of the same until called Professional Practice and I got a 2.1! If you aren't sure what that means, it's the second best mark you can get. It goes First (70%+), 2.1 (60%-69%), 2.2 (50%-59%), Third (40%-49%) and anything lower than a 40% is a fail. I'm extremely excited with that mark because in my last portfolio tutorial, my lecturer wasn't very impressed with my portfolio... I also got back my mark for my VIVA presentation. The VIVA is an oral exam where we got 7-10 minutes to talk about our work (what it's about, research we've done, experiences gained and a whole lot more). This was one of the most nerve-racking things I've done on the course as it was in front of a lecturer and another person who doesn't necessarily know anything about photography. Instead of just going straight into each artist I looked at, or talking about what style of photography I used, I first had to explain who they were or what it was.... all in 7-10 minutes! Anyway, back to the point, I also got my mark back for that and I got a first!! I am incredibly happy with it, especially because it isn't the work that is marked, but it's how much you know about your work that matters. The VIVA and the dissertation are part of the same unit called Visual Cultural Dissertation, so my final mark for that is now a solid 2.1!

I'm only waiting for two more marks, which happen to be the most important marks! The first is my practical work of my 7591 Miles project, and the second is my research mark for both my Succession work as well as my 7591 Miles work. I should be getting that back sometime this week.

Other than the marks, a lot has been happening! Firstly we had the preview night of the Portsmouth Show which was a great success. Before the show I emailed my lecturer to see if I could create a time lapse of the night. He was very enthusiastic and recommended I work with another student interested in time lapses called Will Rudman. On the preview night we ended up using 4 cameras to take time lapses and some videos. We spend four and a half hours editing it yesterday and I am so proud of what we've made. Here is the link: http://www.youtube.com/watch?v=aepp6JEchwY&feature=youtu.be.

I've also continued the weekly photo challenges, but I will create a separate post for them. I will also add some more specific posts after this one to show you in more detail what I've been up to!

Saturday, March 2, 2013

Motion Blur Time Lapse Analysis


The reason I decided to put these scenes together is because of the matching colours throughout the whole video. The video starts off with quite a light scene, with a pastel blue, light brown, a bit of green, and a pastel yellow. There is a dark line straight through the middle of the photos. To me, this scene almost looks like fire. It is one of the most abstract scenes in the video. The reason I decided to start off with this scene is firstly because it’s from my first motion blur time lapse, so it’s keeping it in order, but also because it’s completely unrecognisable. I want people to guess what they’re looking at rather than knowing it straight away.

The second scene is quite a bit darker, but still very obscure. The colours match with the darker colours from the initial scene. The lines are completely straight, which relates back to the tree trunk in the middle of the photo of the first scene. At some points you can see a bit more detail towards the tops of the trees, but it’s so quick that doesn’t defeat the abstraction.

The third scene is probably the most obvious scene. I’m standing a bit further away from the trees, so the landscape is more apparent. The tree on the left of the scene closest to the camera has the most detail. The reason I added this scene is so it starts to indicate what you’re looking at. Each photo is taken in such a similar way, that it almost looks as though I’m taking a photo of a blurred scene, instead of blurring the scene myself. What interests me about this scene is the fact that you can see the tops of the trees moving in the wind – something that you would normally take a time lapse of.

The colours in the fourth scene are similar to the ones in the first scene. It’s got a very pastely green in it, and a bit of light blue towards the top. In this scene there wasn’t any natural movement so I stood close by a road. It was getting a bit darker at the time so cars started to use their lights. This created interesting shapes within the time lapse and would make the viewer think about what they’re looking at. Again, in every scene so far, the trees have been completely vertical.

The fifth scene is a very interesting scene. This was taken on a different day than all the previous scenes so far. It was a very sunny day with cloudy intervals. This meant I could emphasize the natural changes in the landscape within my time lapse. This scene shows the sun moving through the clouds creating shadows, but also intricate shapes on the trees. The colours are a lot more bold when it’s sunny, but in the shade they are similar to the colours in the third scene. The blue at the top of the photos relate back to the first and fourth scene. This scene is a sort of transition between the start of the time lapse and the end of the time lapse. The first half is all taken on cloudy days, whereas the second half is taken on sunny days. Because this scene includes sun and shade, it was the perfect way to transition.
The sixth scene reminds me a lot of the first scene. The colours are very similar and composition of it is quite similar. The green bushes towards the bottom of the shot keep getting hit with sunlight and then darkening again when the sun disappears. It’s not as obvious as the previous shot, but creates subtle changes.

The final scene is looking up. One of my original digital photos was looking at the tops of the trees and it was one of my most popular photos, therefore I decided to create a time lapse of that image. The colours are similar to the previous scene, the first scene and the fourth scene. It’s very light, but still has some darkness to it. I like the fact that in some of the photos the tops of the trees are very obvious, whereas other photos are completely blurred. This creates confusion.

I decided to add Hans Zimmer’s “Time” song to it as it relates to my concept. The photos are about movement and the juxtaposition between beauty and confusion. But the music adds the sense of time to it. The images reflect on a journey, it’s me looking back at my experience of having lived in all these countries. 

Motion Blur Time Lapse

http://www.youtube.com/watch?v=e1yL3208sko

Friday, March 1, 2013

Motion Blur Time Lapse


As picky as I am, I decided to go back and work on my time lapse again. I thought I was finished with it, but there was something bothering me. The final time lapse sequence of the sky wasn't exactly what I wanted to do, and as I was flipping through my workbook, I noticed I'd taken another motion blur time lapse of the sky which was MUCH better, but I didn't have enough images. Now that I know a bit more about motion blur time lapses and how to edit them, I thought I would give it a go. It's currently in the process of being created, so I don't have a link yet, but when I do let you know! The right image is how the time lapse originally was, and the left photo is what I've changed it to. It's not as abstract, but it looks a lot better, and the faint colour matches the rest of the scenes.

February 2013

Last month I created a video of all the things my boyfriend and I have been up to in January. This started out because of the idea we're moving to Australia in September and want to do as many things as we can while we're in England. Although we haven't done as much as last month, I created another short video about February!
http://youtu.be/q6BtKr06yTs
I really like creating these videos as it's a great way to remember this year. It'll be a pretty crazy one: England, The Netherlands, France, Belgium, Germany, Dubai, Singapore, Australia..... By the end of this year we'll have an amazing video filled with memories.

Wednesday, February 6, 2013

Time Lapse 3

It's been a little quite on the blog, but I've still been busy! I put together my third (and hopefully final) timelapse on Monday. It was a really nice and sunny day although there were cloudy intervals and it was really windy. This worked perfectly with the time lapse, as normal time lapses are usually about the movement of the landscape, eg the tops of the trees moving in the wind or the sunlight moving over time. In the motion blur timelapses, obviously I'm already moving the camera, but since I got the technique down, it was really interesting to see how each of the photos are almost identical, yet the sunlight moves through the frame (it'll make more sense when you view the video) or the tops of the trees create movement.

I pieced together my favourite scenes from each time lapse and made a final piece. The scenes from the second time lapse were all taken on cloudy days, so I couldn't just have half the video in the shadow and half in the sun without some kind of transition. The scene I was talking about earlier, with the sunny intervals is the link between the sun and the shade. I'm really happy with the outcome of my time lapse and hope the lecturers will like it just as much!

http://www.youtube.com/watch?v=naKX4y7kB7M

Sunday, February 3, 2013

Motion Blur Timelapse 2

I wasn't too happy with my first time lapse and I wasn't really sure whether I wanted to do another one. However, Daniel seemed quite impressed with it, and since I do love making time lapses, I thought I'd give it another go. I knew what I did wrong in the first one, so I know what I had to change. I went out again today, but it was a completely different day. It was dark and cloudy and completely motionless. I thought this would be the perfect day for the time lapse, as the darkness would allow me to take longer exposures. But.. it turned out it was just as boring on the time lapse as it was in real life. I did manage to make it a bit more interested by getting the lights from cars in the time lapse. It created some interesting shapes.

After viewing it on the laptop I was thoroughly impressed with myself. Instead of a time lapse that literally looks like I'm shaking my camera about, it's more like I'm taking a video of something that actually looks like that. Each of the photos look almost identical, so the movement in the photos is just the tops of the trees moving (other than a little bit of up and down movement). 

Something that stood out to me during the shoot was the fact that one still image looked completely abstract and unidentifiable, but when the series of photos played as a movie, it was quite obvious what you were looking at. The photo to the right is an example of it. The photo is taken of a really dirty pond. The bottom of the photo is the reflection of the tops of the trees, the green colour is the dirtiness of the pond, the browny-red colour is the muddy ground and the dark lines are the tree trunks. It's not the most obscure photo, but if you didn't have any of the information it could be pretty confusing. Anyway I created a time lapse, and when I played all the photos it just completely contextualised the photo. Some photos aren't as blurred as this one, so when I played the movie it almost seemed like it was picking out all the recognisable bits. The ground is probably the most recognisable in this shot, so if the next shot had the trees in focus, followed by the water in focus, you see the whole shot!

This is the link to the edited version of the video. I used one scene from my previous time lapse as I loved it! But the rest is all taken today. The shot above isn't part of the time lapse:

Tuesday, January 29, 2013

Updates

This week has been pretty crazy. Lots of hours at Subway, the studio, large format shoot, time lapse shoot, research, practical work, trying to find a place to get my work developed, more hours at Subway, lots of train journeys, tutorials etc etc etc. I'm exhausted.

First of all, I created a motion blur time lapse, which seemed impossible at first, then ended up being really easy, but then actually turned out was pretty hard. I'm not completely happy with it, and will definitely need some editing, but here is a link: http://www.youtube.com/watch?v=FhCfJ67C84k. Next time I'm in the Woking area, I'll try this again, but get a more sturdy tripod. The reason the time lapse is a bit all over the place is because while moving my camera up and down, the whole tripod started bouncing up and down too. A sturdier tripod will mean straighter lines, which is what I want to go for.

Secondly, I had my large format shoot, which I already wrote about. The shoot itself was great and I do still love large format, however it's all the stuff you have to do afterwards that's frustrating. Such as the developing and scanning. It wouldn't be too bad, if the university colour processor was working, but unfortunately that's been broken for about 2 months and is currently in Germany.. After a lot of searching/panicking I messaged Fergus Heron to ask where he gets his film processed. He told me about this little place in Brighton where they process the film for £2.50. I phoned them up to see how long it takes to process and they told me 2 hours. The plan was to go to Brighton at 9.33 (be there at 10.45) get to "The Vault" (15 min walk) and get it processed (2 hours - 11.00-13.00), but somehow be back in portsmouth at 14.30 so I could go to work..... I asked whether they could have it finished any quicker and they could! They did it for me in an hour and 15 minutes which left me plenty of time to catch my 13.00 train to be back at 14.15. Phew.

I've also booked the scanner for Thursday afternoon so I can really see how all my images have turned out, but right now this'll have to do!

Finally, I got my marks back for my first semester project (the succession circle) and it's a first!!! Very exciting and an excellent start to the third year. Hopefully all my marks will be this good and I'll pass with flying colours! I also had my dissertation feedback tutorial which was great as well. My tutor explained to me that my content was fine and it's well written, the only criticism is that some bits are too descriptive and others need more analysis. Other than that it's just little bits and pieces that can easily get fixed. She said if the dissertation was marked, it would probably be around a 2:1! My hard work is definitely paying off..


Saturday, December 22, 2012

Time Lapse Link

http://www.youtube.com/watch?v=S2sZFPV2LL8
Watch at 1080p for best quality

Time Lapse


I bought myself an intervalometer for my 7D. I already had one for my 1000D, but I thought if I want to create a timelapse alongside my project, I need it to be the same quality as my photographs. The images in this post are a quick sneak peak of what the time lapse will be like. The time lapse was shot in Horsell Common, but in a completely different area than my Succession project. This was just a test shoot, so I did try out a couple new things. I stayed in each location for 5 minutes and took photos every three minutes.

Monday, December 3, 2012

Time Lapse Final

Change quality to 1080p!!!

http://www.youtube.com/watch?v=SS_2iHZFdUc

I have finally finished the video! I received a few music samples from my brother and decided on the second one he sent me. I think it works really well with the video, I especially like the start where it's quite calm, and in the final scene (of the first loop) it starts to build up.

Sunday, October 28, 2012

Proposal For Next Semester

Along with the practical project, workbook, blog and the dissertation, we also need to write a practical proposal for our project in the second semester. Although it doesn't seem like we have that much to do, it's a ridiculous amount of work. Both my practical project workbook and my research workbook have over 180 pages in Microsoft word!
Anyway, I have already started to work on my proposal for next semester because I don't want to have a last minute panic during my deadlines. It isn't finished yet but I've already got a concept:

I want to combine photography with a time lapse video. Before my first semester project I never thought about making a time lapse, but now I can’t stop thinking about it. I want to shoot in the same location as my set brief project. However, instead of only looking at landscapes, I want to go into more detail about the plant life. I want to make use of macro photography in order to create an abstract photograph of the plants. Alongside these abstract photographs, I want to have a time lapse looking at the landscape. This will convey the context of the photos. The time lapse I created for the first semester project was straight to the point, with landscape shots similar to my final piece. For this project I’d like to look at some more interesting angles, as well as use a camera slider to introduce movement.
For my set brief I started off using digital and later went into large format. I plan to do the same thing for this project. I bought myself a new Canon 7D camera over the summer and I have a 90m macro lens that goes does to f/2.8, and I have a 50mm lens that has an aperture of 1.8. Both of these would be great to use. At the same time, the large format camera will capture an incredible amount of detail which will be key if I want to print off my images large. For the time lapse, I used a gopro at first. The images came out with a massive wide angle effect and I had to edit every picture to get rid of that effect. Therefore, I will be using either my Canon 7D or my Canon 1000D. I already have an intervalometer for my Canon 1000D, and if I end up using that camera it means I can work on both the time lapse as well as the macro photography in one day. I will want to play around with both cameras in order to decide what gives me the best result. Finally, I will want to purchase a DSLR camera slider. I have found a couple on eBay and Amazon for £100.

Thursday, October 25, 2012

Timelapse Distortion


Judy spoke about the lens distortion in my time lapse video and how that could potentially be quite bad. I used a gopro for my time lapse and therefore there was quite a bit of wide angle distortion. Because of the amount of photographs within the time lapse I didn’t want to really fix the distortion in every single photo. In total I took about 1000 time lapse photos in one day, and sitting there editing everything single photo individually would be such a pain! Therefore, I started to do some research into how you can edit multiple photos at once. I looked into photoshop first and there is a way you can “batch” the photos and do the same edit to multiple photos. When I tried it though, lens correction wasn’t one of the options I could choose, so I kept looking. I later found out that in lightroom you can create a certain profile, and that is how you can do the same edit on multiple photos.
I decided to download the free trial of Adobe Lightroom to see how it works. I managed to create my own profile and did the same edit on each of the photos in the first scene of the time lapse. When finished editing you have to export them, rather than in photoshop where you just save the new file.

As you can see from the snapshot above, Lightroom has made a massive difference to the photograph. The photo to the right is the original with the fisheye effect, and the photo to the left is the edited version. I much prefer the look of the photo to the left, especially became my whole project focuses on the idea of having geometrical shapes. Although it does take a long time to edit, and it is very tedious, I will try to edit the whole movie in order to make it match with the rest of my photos.


Link:
Change quality to 1080p for best results. 

Group Tutorial 3


For this tutorial we did a quick version of the 6 thinking hats and reduced it to three major points of discussion. We did look at all of the 5 we looked at last time, but only recorded three of them and added further research.

Information:
·         Project on succession
·         Time, endless process
·         Woodland to heathland
·         Time lapse – landscape changing

Positive
·         Time lapse – positive
·         Figure walking – interesting
·         Music – brother composes
·         Add text
·         Circle image works
·         Think of size and scale
·         Produce text on a leaflet
·         Speak to volunteers, think about having them in the project
·         Look at more scientific work
·         The circle images looks like a clock – representing time
·         The people in the time lapse shows that it isn’t a natural process
·         Divided opinions of whether to have people in time lapse or not

Critical/Move forward
·         Circle shape – do test prints
·         Experiment with scale
·         Look at the converging lines (fish eye)
·         Move the time lapse slower
·         Make the time lapse into a continual loop
·         Test prints – especially acrylic
·         Analyse large format images
·         Do more time lapse videos and make them more fluid

Research
·         Malcolm Andrews
·         Landscape into Western Art
·         Andy Goldworthy

Tuesday, October 16, 2012

Timelapse

With the help of my boyfriend, I created a time lapse of large format experience. It includes both the process of setting up the camera and taking a photo as well as some landscape shots and the gradual movement by the wind or the moving clouds. The link below is the final product, for now. It includes music by Ludovico Einaudi. The video starts off with a beautiful shot of the woodland, and you can see the movement of the sun. It was quite early in the morning, when damp was coming off of the trees, so you can see the rays of the sun moving. It then shows the walk from the woodland to the heathland - indicating how close everything is. Then you can see how I'm setting up the large format camera for a shot in the chopped down area. After this scene you can see a very serene and quite scene where the heathland makes subtle changes. After such a busy scene of me setting up the camera, I thought it would be best to follow that by something very simple. Next is another woodland shot, and you can see a cloud coming over the woodland. Lastly, there it looks at the management on the heathland. Volunteers are actively chopping down trees and removing  shrubbery in order to let the heathland grow. 

I did originally add the video to this post, but the quality came out horrible so here is the link:
Change the quality to HD (1080p)! 


Other tests: